Configuring Your System to Detect Your Android Device
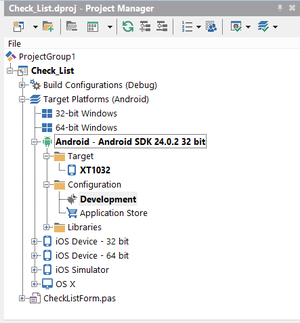
The Project Manager has a Target node located inside the Android target platform node. The Target node lists any Android device that is connected to your system via USB cable and has been enabled for USB debugging. In the Target node, the name of the active target device is displayed in boldface.
To Install, Configure, and Activate your Android Device as Your Target Platform
- Install the USB driver for your Android device.
- Enable USB debugging on your Android device.
- Connect your Android device to your development system using the USB cable provided with your device.
- At the AutoPlay prompt, select Open device to view files.
- In the Control Panel, search for and select "update device drivers".
- In the system Device Manager:
- Your Android device should be listed under Portable Devices. Locate and right-click your Android device, and select Update Software Driver.
- Browse to the \extras folder in your installed <SDK> directory, and select the folder that matches your Android device. Then click OK.
- For example, select google for the Nexus 7 or Nexus 10 tablet.
- If you do not find a folder for your Android device, see Installing the USB Driver for Your Android Device.
- Verify that your Android device is now:
- Listed in Windows Explorer, below the system disk drives, along with your mapped network drives.
- Displayed in the Target node in the Project Manager.
Troubleshooting
If your device is not correctly detected in RAD Studio or in the system Device Manager, check the following:
- Ensure that your Android device is unlocked and not sleeping while connected via USB. Set the appropriate option in Settings or Developer Options.
- Make sure your Android device is enabled for USB debugging. On many Android devices, you can verify whether USB debugging is enabled by visiting the Settings|Developer Options page.
- Install the USB driver for your Android device.
- If the battery in your Android device gets exhausted, first recharge the battery and then install the USB driver again.
- If your Android device was previously shown in RAD Studio but is not shown now, try uninstalling the USB driver, disconnecting the device, reinstalling the USB driver, and then reconnecting the device.
- Also revisit your device settings and verify that USB debugging is enabled on your device, and the device is set to stay awake while connected to USB.
- For more information, see:
- http://developer.android.com/sdk/win-usb.html (Google USB Drivers)
- https://developer.amazon.com/sdk/fire/connect-adb.html (Kindle Fire USB Drivers)
- http://developer.android.com/tools/extras/oem-usb.html (OEM USB Drivers)
- In your system Device Manager, click the
 Scan for Hardware Changes button (or right-click your computer name and select Scan for hardware changes).
- If you are running KIES, quit this application while working with RAD Studio. KIES conflicts with the underlying software that RAD Studio uses to detect Android devices.
- If you are using a Kindle Fire, see Installing SDK Add-Ons in the Amazon documentation to configure your system to detect your device.

